If your dishwasher has been working for several quite a while now, it definitely needs a reset.
Activating the samsung dishwasher diagnostic mode is a way to troubleshoot and diagnose any issues that might be wrong with the appliance.
Personally, I like to maintain and care for my dishwasher a lot which is why I don’t usually joke with the diagnostics.
If you are here to learn about how you can get around the diagnostic mode on your samsung dishwasher, be rest assured that we’ll take you through the journey.
It’s even a lot easier to detect potential malfunctions as soon as it manifests in your appliance. Let’s get into the real deal.
How To Enter Samsung Dishwasher Diagnostic Mode
Basically, there are several models and types of Samsung dishwashers that come with slightly different features and settings.
This implies that the way to enter the diagnostic mode on your own dishwasher might be different from mine depending on the age and other factors.
In general, most Samsung dishwashers have the same or similar procedures of the diagnostics.
Here is the step-by-step procedures on how to enter the diagnostic mode mode on your samsung dishwasher (generally).
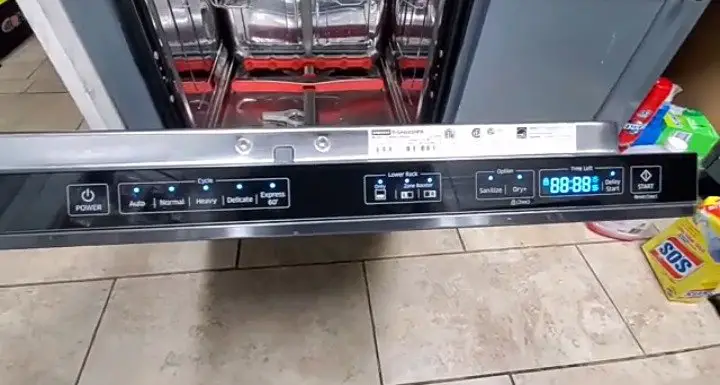
- Step 1: Turn on the Dishwasher from its power source. Either from the wall, socket outlet or by switching to circuit breaker.
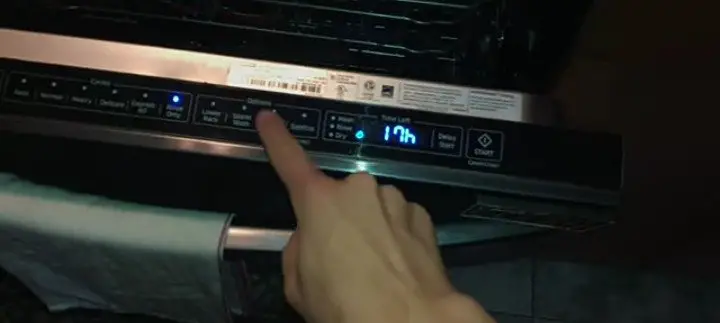
- Step 2: Press and hold the “Delay/Start” keypad until the time left display on the screen reads “17h“…
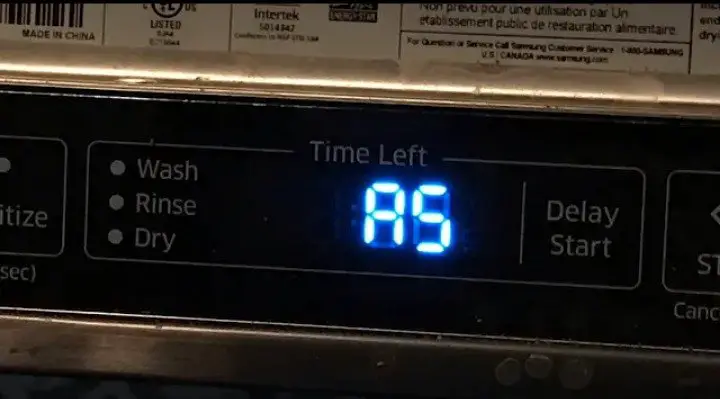
- Step 3: Now, also Press and hold “High-Temp” button until “17h” changes to “AS” on the display screen.
- Step 4: Finally, press the “Start” button in order for the unit to begin to the test or diagnostic cycles..
- “Ot” will be displayed on the screen signifying a successful or complete test otherwise an error code will be flashing which means there’s a problem or defect on the Dishwasher.
That’s the simplest illustrated way for you to activate the diagnostics mode which is common for more samsung dishwashers.
Note that after the test mode has been initiated, this will carry out specific test cycles and test all the dishwasher functions in order to make sure they’re working perfectly.
What Are Test cycles On Your Samsung Dishwasher?
There’s a total of 5 test cycles that will be carried out during the diagnostic mode on your samsung dishwasher.
Literally, the aim of these diagnostics cycles is just to help diagnose any issues on your dishwasher while preventing further damages.
There are 5 different diagnosis or test mode that are carried out consecutively in a samsung dishwasher diagnostic mode.
- Drain test
- Water Fill test
- Spray test
- Draining the water test
- Auto release test
1. Drain Test
This test will make sure that the drain pump and every other components directly associated with the drainage system are working perfectly.
In the the Drain test, you’ll see “1” blinking on the display to signify that you’re in the first test of the dishwasher diagnostic mode.
Depending on the problem with your dishwasher, this particular test shouldn’t take more than 2 minutes to complete before proceeding to the next test which is filling the water test.
2. Water Fill Test
This is test number 2 and it usually checks the fills the dishwasher with water and test the components like the water inlet valve while monitoring the water level sensor.
It also ensures that your dishwasher isn’t leaking, so you can manually check the bottom of the openings and sides to inspect if there are signs of leaks.
3. Spray test
This test will be indicated with a blinking “3” light on the display of your dishwasher.
It sprays water onto the top racks, bottom racks and spray arms in order to ensure proper troubleshooting.
You’ll be able to hear noice of spray coming from inside the dishwasher as the process is undergoing.
4. Draining the water test
The pipes are tested by draining the water in this test and you’ll be able to hear sounds of gurgles in the sink which confirms this.
Give the appliance time to drain the water at best and proceed to the next test.
5. Auto release
This is the fifth and last step where the dishwasher finalizes the diagnostic mode and open automatically at the end.
This test for any Error codes that’s stored in the dishwasher’s memory and displays it on the control panel.
However, if no issues were found on the Dishwasher, “ot” will be displayed which indicates completion of the diagnostic mode.
Here’s an illustrative video that will guide you through.
Different Models And Their Diagnostic Mode
Some samsung dishwasher models have a different way of activating the Diagnostic Mode.
I’ll be showing you how you can enter this test mode if your model is different from the one we highlighted above.
Samsung Waterwall Dishwasher Diagnostic Mode
If this is the type of Dishwasher you have, you can enter the test mode by following the procedures below.
- Turn the dishwasher on and open the door.
- Under the lower rack button set, press and hold the “Power” and the “Zone+Booster” button at the same time, then release.
- After hearing the unit beep, Press the “Power” button and you’ll hear another beep again from the unit as it displays “00:00″ on the control panel.
- Now, press the “Auto” button twice and you’ll see a display of “dC” on the dishwasher control panel.
- Lastly, press the “Power” button and close the door. The test mode should begin after doing that.
Samsung Dishwasher Test Mode On older Dishwashers
On some older models such as DMT800RHS/XAA, DMT800RHB/XAA, and DMT800RHW/XAA, here’s how to enter the diagnostic mode.
- Power on and close the Dishwasher door.
- Press the “Power”, “Heavy” and “Delicate” buttons simultaneously for 2 seconds until the LEDs are illuminated as the software version comes up.
- You can switch between modes by pressing the Normal button.
Samsung Dishwasher Diagnostic Codes
These codes are the error codes that appears whenever there’s a problem with your dishwasher.
It can be displayed in form of actual digit codes or by the flashing of a specific button.
Here’s a table that illustrates some diagnostic codes, their meaning and how to fix.
| Error codes | Their meanings | Easy fixes |
| 1E, IE code | Clogged filter error | Clean the filters using the instructions in your user manual |
| 5C, 5E cise | Drain error | Check the drain connection and hose should if they’re properly connected to the dishwasher. |
| 9E code | Low water level error | You need to empty out the dishwasher or run a normal cycle while adding detergents. |
| LC code | Leakage error | Check for leaks around and fix |
#1. Samsung Dishwasher LC Code
If the samsung lc code is displayed on the control panel after the diagnostic mode, it’s an indication of a blocked water reflector or the leak sensor detected a leak. Follow the link above for proper troubleshooting
#2. Samsung Dishwasher OC Code
This code means the dishwasher is experiencing a water overflow error which means there’s too much water in the appliance.
The OC code on samsung dishwasher is normally associated with the water inlet valve or power assembly.
#3. Samsung Dishwasher Blinking Heavy Light
If the Samsung heavy light is flashing on the control panel after the test mode, it’s basically an issue with the water system which means there’s too much water in the appliance.
#4. Samsung dishwasher normal light blinking
For a blinking normal light, it means there’s a leak somewhere which is mainly due to tight screws or unbalanced dishwashers.
Final Thoughts
The diagnostic mode is really important for your dishwasher to identify the causes of some functional issues and help troubleshoot it. It also saves you time and money.
We hope you’ve been able to activate the test mode on your Samsung dishwasher regardless of the model. Thanks for reading.
Related contents: